Revised Chimichangas

Saturday, June 9, 2012

| | | 1 comments


I've learned a lot about chimichanga’s since I first blogged about them and I thought I should share…

First I need to show an easier way to make them…  before I had everything in a mixing bowl including cheese… one day I really wanted to make them but had no mozzarella cheese and I figured why not leave it out?? Since there is enough fat in the sour cream and cream cheese I figured I could skip it… I was feeling extra lazy that day and completely skipped putting it all in the mixer and just mixed in my pan I was cooking the onions and peppers in..

So here is the revised chimichanga recipe… or is it new and improved??  Or different look same great taste?? Chimichanga’s for the lazy ? what ever you want to call it here it is….


Slice up your garlic, onions and peppers..


Sauté until your liking.. I like a little bit of crunch to my vegys and for them to be brown… so don’t over crowd your pan or turn it on low thinking you will keep them from burning… if you are diligent about cooking and stand over the pan like a helicopter Mama then you won’t burn… turning your pan on low will only cause them to turn into mush…


Salt and cumin


Add your cream cheese… NOW turn your pan to low… and keep stirring until completely melted..


Turn off pan and add sour cream…  mix well. If you are a carnivore at this point add your diced cooked chicken or steak


Another thing I learned… ( the hard way ) was your burritos need to be soft and since I refuse to have a microwave in my house I heat a huge pile up like so…


Stacked on a griddle on…. High heat…. And a little oil in your pan.. My sister doesn’t use oil but I like to… either way is fine


Heat 30 seconds and flip over…


Like your cutting cards… ( why should I know such a horrid thing) flip over half of the burritos and continue until all are warm…


Heating each side 30 seconds at the most..


Lay out one…


Spoon some filling


Fold over


Tuck the bottom part of the burrito inside the top like so… I know the other side is hanging out..


Fold over… see how tight these are??? It keeps them from opening up so much as you fry them
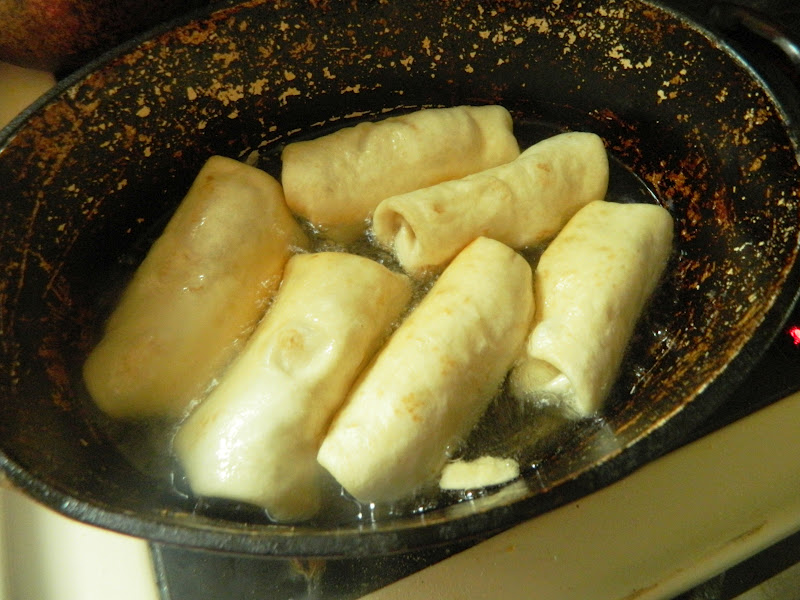


I like to crowd the pan so they have less room to expand, turning constantly


Drain on paper towels


You can make these a day ahead.. just lay out in a pan and bake at 400f  for 20 minutes… they will brown more in the oven so make sure you don’t brown them too much when you fry them.. 
I usually make a huge batch and put a few in DH lunch for the next few days… I have yet to freeze them so I have no clue what they would be like after…
There is no recipe… I am too lazy for that… just add what you have in the kitchen… and most of all have fun and enjoy making a meal that would have cost you tons at a restaurant.

Raviolis... a Pigs Dream Dinner

Saturday, June 2, 2012

| | | 0 comments


I have a ravioli pig….
When I buy them premade  he will eat almost a whole bag… ( it is everything he loves… cheese and pasta in one neat little package) and since they are almost if not over 3 dollars a bag I don’t buy them as much as I want…
When I get some extra burning money I will by This , since rolling out four at a time is too time consuming and I won’t make this as often as Mr. Pig would like.
So this is something else you can do with the pasta dough I posted about earlier this week.


First lets make the filling… with ricotta cheese, salt and eggs. The last time I made the filling I had to drain it for a while before even thinking about adding the eggs.


So drain the cheese…drain?
This is so drained I worry it might not be worth my eggs or pasta dough. Lets carry on…


Add eggs and salt
Mix well and set in fridge until ready to use… This is just what I use for my filling…I never measure I just dump and taste…so feel free to use your own recipe for filling


After your pasta dough has rested for about 30 minutes or longer dust your counter with flour and slice off some of the dough… I like to keep a cup of flour handy for a quick dusting .


Set your roller to the widest setting and roll out dough… continue with each setting with your pasta roller. Dust with flour when it starts to feel sticky.


Lay out two sheets on a flour dusted counter like so… don’t dust the top because we want the sheets to stick together.


Here are my ravioli presses… the one on the left my sister found for me that works the best… the one on the right I coughed up too much money for it..


Put about a heaping tablespoon on one sheet like so…


Then fill up the rest of the sheet


Lay top sheet down


Press down around filling


Ravioli press…


Perfecto!
In large pot filled with boiling salted water cook raviolis for about 3 to 4  minutes… at this point since there is no pictures, just imagine.


Serve with some homemade sauce of your choice… don’t ruin them with a store bought sauce!

Orange Cake

Friday, June 1, 2012

| | | 1 comments


I love this recipe… Only 6 tablespoons of butter used!!! 

My butter stash is getting low but I wanted to make a cake…… actually I wanted to do a orange creamcicle but couldn’t find a recipe that didn’t start off with a boxed cake mix.. and since I didn’t have any fresh oranges this time around and I knew I had some orange juice in the freezer so why not just use that?
Halfway through I found out I didn’t have enough sour cream or plain yogurt ( that I used the first time I made this cake and it turned out wonderful) for the “cream” part of the cake so I settled for just an orange cake.


In a medium size bowl add your flour, sugar, salt and baking soda set aside


In mixing bowl add your wet ingredients


Mix well and then add your flour


Mix that well until smooth


This is what happens to my counter when I bake….. doesn’t that look fun to clean?


Pour into prepared pans and bake


Baked and cooled! Ignore that weird spot on that one over there…


Now for the icing …. The original recipe calls for a lot more butter and powdered sugar.. and I figured if you cut down on the butter you can cut down on the powdered sugar.. it doesn’t make a lot of icing and if you want that kind of cake then double the icing..  add everything but the powdered sugar and mix well


Add your powdered sugar and beat until light and fluffy


I thought I was going to do four layers with this cake but I am not feeling that energetic today so it will only be two layers.. icing between cake layers


Now icing all over…


Again… not the best looking cake… and since it is only for the family and not company I just slopped the icing on…


Orange Cake Recipe


Ingredients:


Cake:
2 ½ cups flour
1 ¾ cups sugar
1 ½ teaspoon baking soda
1 teaspoon salt
1 cup oil
1 cup orange juice
3 eggs
1 cup sour cream

Icing:
6 tablespoons butter
8 ounce cream cheese
¼ cup orange juice
2 cups powdered sugar

Directions:

Preheat oven to 350f
Oil and flour two 9 inch round baking pans
In medium size bowl add flour, sugar, salt, and baking soda. Set aside
In mixing bowl add eggs, oil, orange juice, and sour cream beat well and then add your flour mixture and beat 3 to 4 minutes scraping down sides halfway through.
Pour into pans and bake 25 to 30 minutes until toothpick test is right
Remove from pans and let cool completely.
Icing :
Add your butter, cream cheese, and orange juice in mixing bowl
Mix until smooth and add your powdered sugar.. mix that till completely smooth and fluffy about 4 to 5 minutes.
Proceed with icing of cake.

LinkWithin

Related Posts Plugin for WordPress, Blogger...

Total Pageviews

free counters